Die ~ Namites Dies Blog Hop ❤My Notes❤ ❤A...Tutorial...for...you❤
Hallo Ihr Lieben!
Herzlich Willkommen zu unserem "Premieren" Die~Namites Blog Hop.
❤ ❤ ❤
Hello Everybody!
Welcome to the “Premiere” Die~Namites Dies Blog Hop.

Wir freuen uns sehr, dass Du Dich entschieden hast, dabei zu sein!!!
Der Blog Hop läuft vom 9. bis 11. August.
Der Blog Hop läuft vom 9. bis 11. August.
Bei dem Blog Hop werdet Ihr Kreationen und Inspirationen von
unserem ganzen Die~Namites Design Team sehen.
Wir alle haben Stanzen aus dem neuesten Release benutzt.
Wir alle haben Stanzen aus dem neuesten Release benutzt.
We are so happy that you have chosen to join us!!!
Our blog hop will be from August 9th ~ August 11th.
Along the way, you will see creations by our Die~Namite Design
Team using the LATEST release of Die~Namites Dies.
Alle Die~Namites Designer werden Euch zeigen, wie Sie
Ihre Werke gemacht haben. Dazu seht Ihr Video- oder Bilder Tutorials.
Jedes Designteam Mitglied hat ein Geheimwort auf dem persönlichen Blog.
Sammelt all diese geheimen Wörter. Über einen Kommentar auf den
Blogs des Designteams würden wir uns freuen. Wenn Ihr alle Wörter
gefunden habt, habt Ihr die Möglichkeit einen unserer Preise zu gewinnen.
Ihr erhaltet eine zusätzliche Gewinnchance, wenn Ihr unsere Facebook Seite
beitretet und Euch für den Email Newsletter anmeldet.
The Die~Namites Design Team Members will be sharing with you
how they made their pieces through video and picture tutorials.
Each of the Die~Namites Design Team Members
will have a secret word.....on their blogs.
Collect all the words, make sure to leave a little love,
to find the secret phrase this will give you one entry into our prize
drawing.
You will receive additional entries for
Liking us on Facebook
Signing up for Email Notifications.
Wir verlosen als Hauptpreis
einen $50-Geschenkgutschein von Die~Namites Dies
einen $50-Geschenkgutschein von Die~Namites Dies
und fünf mal einen $10-Geschenkgutschein von Die~Namites Dies.
We will be awarding
one
Grand Prize of a $50 Gift Certificate to Die~Namites Dies
and 5 ~
$10 Gift Certificates to Die~Namites Dies.
Nun aber genug all der Worte wie es abläuft.....
Lasst uns den Blog Hop beginnen....
Lasst uns den Blog Hop beginnen....
So enough about the
logistics....
LET THE HOP BEGIN....
Dunja Dücker
(you are here)
(you are here)
Wenn Du von der lieben Taniesa Vlasak zu meinem Blog
gehüpft bist, bist Du richtig. Falls Du zufällig bei mir gelandet
bist, dann geh bitte zum Die~Namites Dies zurück.
Der nächste Stop ist bei meiner lieben DT Kollegin Susie Moore.
If
you have arrived here from my’s blog from
my sweet Teamie Taniesa Vlasak you are in the right
place.
If you have just arrived in the midst of our Blog Hop
please head
to the Die~Namites Dies.
Wir wünschen Euch viel Spaß beim Premiere Blog Hop von Die~Namites.
Hope you enjoy the “Premiere” Die~Namites Dies Blog Hop!!!
Mein geheimes Wort lautet:
Schau nun auf dem Blog von Susie um den Premieren Blog Hop von Die~Namite fortzusetzen.
My secret word is:

Für mein Tutorial für Die~Namites habe ich einem Notizbuch ein Cover verpasst ;)
For my tutorial for The ~ Namites I designed a cover for a standard notebook. ;)
For my tutorial for The ~ Namites I designed a cover for a standard notebook. ;)
Zunächt habe ich für das Cover Kraftpapier verwendet
und auf 30,5 cm x 14,5 cm zugeschnitten.
At first I have used kraft paper for the cover.
The measure of the blank is 30.5 cm x 14.5 cm.
At first I have used kraft paper for the cover.
The measure of the blank is 30.5 cm x 14.5 cm.
 |
| Links und Rechts habe ich 4 cm vom Rand entfernt das Papier gefalzt. On the left and right outer side I have seamed contoured at 4 cm from the edge of the paper |

 |
| Nun habe ich zwei Zuschnitte gefertigt weißer Cardstock: 1x 21,5 x 14 cm - Designpapier: 1x 21,0 x 13,5 cm Diese Zuschnitte werden der Größe nach auf einander geklebt. Now I've done two Cut Outs The white cardstock: 1x 21,5 x 14 cm - Design paper: 1x 21,0 x 13,5 cm These blanks are glued to each other according to size. |
 |
| Auf der Rückseite markiert Ihr die Löcher für die Eyelets. Diese habe ich mittig bei 7 cm und 1,5 cm vom Rand entfernt gesetzt. On the backside you have to marked the holes for the eyelets. I have done this in the middle, at 7 cm, 1.5 cm from the edge. |
 | ||

Nachdem die Eyelets gesetzt sind, ich habe dazu meine Crop-A-Dile benutzt,
habe ich den Bastelbast (ca. 2 x 50 cm) durchgezogen.
Once the eyelets are set, I did this using my Crop-A-Dile,
I did pulled through the craft raffia (about 2 x 50 cm).
Once the eyelets are set, I did this using my Crop-A-Dile,
I did pulled through the craft raffia (about 2 x 50 cm).
 | |||
| Der Bastelbast wird mit einem Klebeband befestigt. Die Enden werden nach außen gezogen, damit Ihr das Büchlein zusammenbinden könnt. The craft raffia is fixed with an adhesive tape. The ends are pulled outwards so that you can bind it together. |

 |
| Der hintere Umschlag wird mit dem Noitzbuch zusammengeklebt. Nur den hinteren Teil, da sich das Buch sonst nicht mehr zusammenklappen lässt! The backcover is glued together with the notebook. Only the rear part because otherwise you can not fold the notebook! |
 |
| So schaut das Büchlein aus, wenn Ihr alles zusammengeklebt und die Schleife gebunden habt. Jetzt beginnt das Dekorieren. :) Thus the book looks like this when everything is glued together and the loop was tied. Now you have to start the decorating. :) |


Ich habe mir die Stanze Summer Branch (DN-1056) ausgesucht.
I have used the Die ummer Branch (DN-1056)
I have used the Die ummer Branch (DN-1056)

Das Büchlein habe ich dann mit Washitape, den ausgestanzten Zweigen,
Pailetten und Alphabetstickern verziert.
The decoration I did with Washitape, the punched branches,
Sequins and alphabet stickers.
Pailetten und Alphabetstickern verziert.
The decoration I did with Washitape, the punched branches,
Sequins and alphabet stickers.

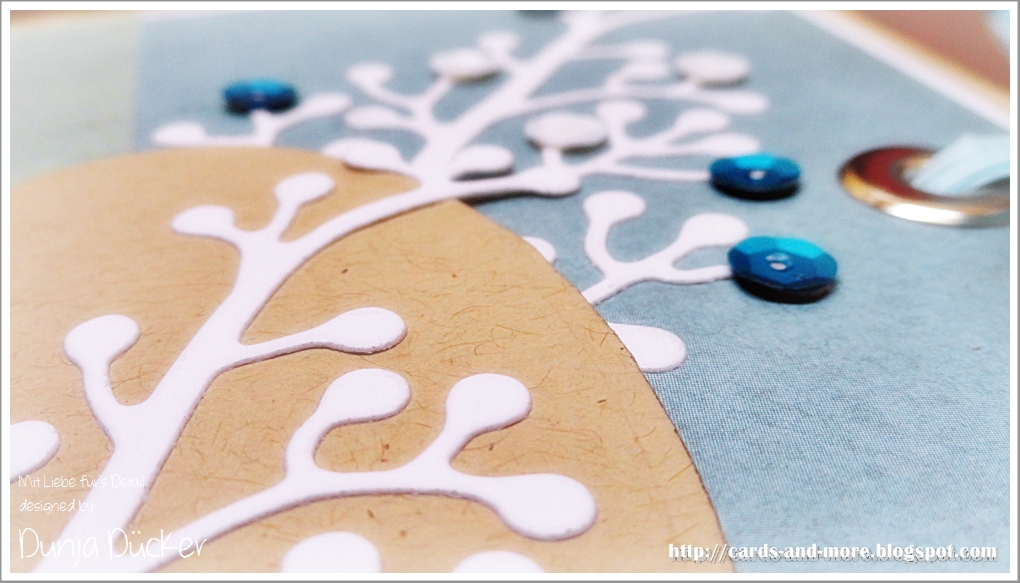 |
| Hier seht Ihr noch ein Detailbild der SUMMER BRANCH Stanze. Here you can see a Detailpic of the SUMMER BRANCH Die.. |
Ich hoffe, mein Notizbuch und das kleine Tutorial dazu, haben Euch gefallen. :)
I hope that you enjoyed and liked my little Tutorial :)
Wenn Ihr Fragen zu dem Tutorial habt, schreibt mich bitte an.
If you have any questions about the Tutorial, please feel free to contact me.
I hope that you enjoyed and liked my little Tutorial :)
Wenn Ihr Fragen zu dem Tutorial habt, schreibt mich bitte an.
If you have any questions about the Tutorial, please feel free to contact me.
❤ ❤ ❤
Bei mir gibt es zusätzlich zum Blog Hop eine Wundertüte zu gewinnen.
Verlinkt dazu bitte mein Tutorial Banner auf Eurem Blog.
Ihr könnt dazu einen Blogpost schreiben oder es in der Sidebar eintragen.
Hinterlasst einen Kommentar unter diesem Beitrag.
Ihr dürft Euch auch gerne als Verfolger / Leser meines Blogs eintragen.
Die Auslosung erfolgt am Montag, 12.August.
Viel Spaß und viel Glück bei unserem Premier Blog Hop von Die~Namites.
Ich drück Euch fest die Daumen :) Schaut nun auf dem Blog von Susie vorbei.
❤ ❤ ❤
Habt einen tollen Start ins Wochende!
Have a great weekend everybody!
Have a great weekend everybody!


45 Comentarios
Dunja....what a SUPER FABBY note book....would be proud to have that on my desk!! LOVE IT!!
AntwortenLöschenWhat a sweet little notebook!!! Thank you for sharing the tutorial!! What a beautiful way to use the Summer branch die!! And adding the sequins for the little extra sparkle is wonderful!!
AntwortenLöschenWhat a sweet little notebook! Thank you for sharing the tutorial. I love the Summer Branch die on the cover!! It is perfect!! The sequins add the perfect touch!!
AntwortenLöschenDunja girl your little notebook is ADORABLE love how you used the dies with squins....thanks for a great tutorial and wonderful pics...thanks for sharing with us.
AntwortenLöschenhugs,
Peggy Lee
At first I panicked as I don't understand your foreign language I'm sorry. However, your step by step through beautiful photos fills me with confidence that I could certainly try recreating a piece like yours. Thank you for sharing and happy crafting
AntwortenLöschenYour tut was great and love that little branch. Love the use of sequins, great idea.
AntwortenLöschenGreat notebook!
AntwortenLöschenmerci, ton tuto est superbe et très bien expliqué, biz
AntwortenLöschenJust beautiful. Love the ideas.
AntwortenLöschensuch easy way to create notes, thx Dunja
AntwortenLöschenEine klasse Idee mit super Anleitung, vielen dank dafür!
AntwortenLöschenLG
Michaela
Ein wundervolles Notizbuch!! Danke fü die tolle Anleitung!
AntwortenLöschenGlg, Sonja.
Loved your little note book decorating the front with the die cut was a super cute Idea.
AntwortenLöschenI am following you now too, Hugs Larelle-Susanne
A very neat and crafty cover! Thanks for sharing it.
AntwortenLöschenNoreen
Crafty Journal
Love the tie closure and that Summer Branch die is tops on my list!
AntwortenLöschenThanks for the tutorial!! I really like it! And going to try it!
AntwortenLöschenHugs,
Krista
Love your notebook project. TFS
AntwortenLöschenSuper cute and fun little notebook cover!!! Love the details and thanks so much for sharing :-)
AntwortenLöschenWhat a lovely project. I love the tie closure. Thanks so much for the tutorial.
AntwortenLöschenSuch a beautiful way to cover a notebook. I love it Dunja <3 simply beautiful!
AntwortenLöschenA fantastic die. I think this one will be a favourite
AntwortenLöschenEin klasse Notizbuch, danke für die tolle Anleitung.
AntwortenLöschenLG
Sabrina
Beautiful cover for your notebook, thank you for sharing.
AntwortenLöschenHallo Dunja,
AntwortenLöschena wonderful step-by-step tutorial. Womit hast Du die Pailetten befestigt ? Vielen Dank für die Anleitung
Ute
Great tutorial! Love how you decorated your notebook cover! :)
AntwortenLöschenHallo Dunja.
AntwortenLöschenWas für eine tolle Notizbuchabdeckung du da geschaffen hast: EINWANDFREI. Die Anleitung habe ich mir gleich mal unter die favouriten gelegt.
Lg Inga
Thanks for the tutorial.
AntwortenLöschenWhat a lovely booklet type of card! This die is so sweet, too. Your photos clearly describe your creative process, even though I don't understand the language!
AntwortenLöschenI am not sure the secret word is right in terms of translation....will have to see at the end!!! Thanks for some wonderful inspiration!
Your notebook came to life w/this die and sequins! Beautifully done! Thanks for the tutorial!
AntwortenLöschenThis is just wonderful! Thanks for a great tutorial, and a beautifully done project. Love your use of this fabulous die!
AntwortenLöschenVery pretty booklet. Very easy instructions to follow. Love the look of the sequins. Adds a very pretty touch.
AntwortenLöschenVery pretty booklet. Your instructions were easy to follow. I love the sequins. Very pretty touch.
AntwortenLöschenlovely book-thanks for the tutorial-I love the die it definitely adds to the project. Thanks for sharing!
AntwortenLöschenwooowww thanks for sharing your tutorial!!!! Great!!!!
AntwortenLöschenLoved the notebook tutorial. I will definitely have to make one of those.
AntwortenLöschenWhat a great tutorial and I love the notebook.
AntwortenLöschenYour little note book tutorial is just awesome! I really love the summer branch die it really makes this notebook special!
AntwortenLöschenI adore your little note book tut! Thanks so much for sharing it with us!
AntwortenLöschenI like your notebook. You made it a great present for someone!
AntwortenLöschenWow! Thanks for showing us how to make that sweet little book!
AntwortenLöschenLove the notebook. My granddaughters would love it.
AntwortenLöschengreat notebook. thanks for sharing
AntwortenLöschenYour notebook is so cute, great tutorial, I'm going to try one of these!!
AntwortenLöschenOh das Büchlein ist wundervoll. Danke für das Tutorial!
AntwortenLöschenEin tolles Tutorial für eine wundervolle Buchhülle - lieben Dank!
AntwortenLöschenViele Grüße
Sabrina
Dieser Blog ist mit Blogspot, einem Google-Produkt, erstellt und wird von Google gehostet. Es gelten die Datenschutzerklärung & Nutzungsbedingungen für Googleprodukte. Durch das Setzen eines Häkchens vor „Ich möchte Benachrichtigungen erhalten“ könne Sie Nachfolgekommentare per E-Mail abonnieren. Laufende Kommentarabonnements können jederzeit durch das Entfernen des Häkchens oder über einen Link in der Benachrichtigungs-Mail abbestellt werden.
This blog is created using the Google's Blogspot service and is hosted by Google. Google’s Privacy Policy and Terms of Service apply. You can subscribe to follow-up comments via email by checking the box „Ich möchte Benachrichtigungen erhalten“. To unsubscribe you can either uncheck the box or click the corresponding link in the notification e-mail.