Hallo ihr Lieben, juhu, bald ist Wochenende. Auf dieser Karte ist ein
Regenbogen-Schmetterling gelandet. Wie das funktioniert, erfahrt ihr
heute zum
 💜Mit-Mach-Freitag💜 bei
Crafter's Companion
💜Mit-Mach-Freitag💜 bei
Crafter's Companion. Zunächst habe ich Watercolor Paper in Streifen
geschnitten und die Schmetterling Stanzen aus der Flutterby Kollektion
genommen. Das Papier ist mit den Spectrum Noir Aqua Marker eingefärbt.
Die verwendeten Farben seht ihr auf dem Bild. Die Flächen müssen so groß
sein, dass der mittlere Schmetterling ausgestanzt werden kann. Nachdem
der Schmetterling mit der Gemini Maschine ausgestanzt worden ist, ich
für den Hintergrund der Karte den Embossingfolder Warm Blanket benutzt.
Wie der Schmetterling in Regenbogenfarben zusammengeklebt wird, seht ihr
auf den Detailbildern.
Hello my dears, yeah, it's going to be weekend. On this card a rainbow butterfly has landed. How it works, you will learn today at the "Mit-Mach-Freitag" at Crafter's Companion. First, I cut Watercolor Paper into strips and took the butterfly stamps from the Flutterby collection. The paper is dyed with the Spectrum Noir Aqua Marker. The colors used you can see in the picture. The areas must be so large that the middle butterfly can be punched out. After
the butterfly has been punched out with the Gemini machine, I used the
embossing folder Warm Blanket for the background of the card. How the butterfly is glued together in rainbow colors, you can see on the detail pictures.
Ich wünsche Euch einen sonnigen Start ins Wochenende und vergesst nicht, dass das Designteam Verstärkung Deutschland sucht Verstärkung ;))
I wish you a
sunny start into the weekend and don't forget that the Design Team Call is still open - only germans this time ;))
Dunja xxx

Hallo Zusammen, heute zeige ich Euch meinen ersten Beitrag für das Pronty Crafts Design Team. Ich freu mich sehr, dass ich dabei sein darf. Als ich die Anfrage erhielt, habe ich nicht lange gezögert und ja gesagt.
Hi, today I show you my first contribution to the Pronty Crafts design team. I am very happy that I am part of this team. When I received the request, I did not hesitate for a long time and said yes.
Ich habe ein MDF Brief Regal gestaltet. Das MDF Grundgerüst habe ich dazu zunächst zwei mal mit Gesso eingestrichen. Die erste Schicht etwas dünner, damit die zweite Schicht deckend ist. Das alles habe ich dann gut trocknen lassen.
I designed an MDF letter rack. I painted the MDF parts two times with gesso. The first layer is slightly thinner, so that the second layer is color-covering. After that is has to dry well.
Ich wollte gerne die Mask Stencils ausprobieren und habe ich mich für die "Haringbone" Schablone entschieden. Mit den Stempelfarben von Distress Oxide habe ich dann das Muster auf alle Einzelteile aufgetragen. Um einen schönen Wasserfarben Effekt zu erhalten, gibt man Wasser auf die Farbe.
I wanted to try the Mask Stencils and I chose the "Haringbone" template. With the stamp colors of Distress Oxide I applied the pattern on all items. To get a beautiful watercolor effect, add water to the color and let it dry or use a heattool.
Nachdem alle Einzelteile fertig waren habe ich es erneut gut trocknen lassen und dann mein MDF Brief Regal zusammengesetzt. Durch die Nut passen die Teile sehr gut zusammen und halten auch, ohne, dass man Klebstoff verwenden muss.
Ich konnte mich noch nicht entscheiden, es zu dekorieren, daher ist es noch 'blanko' in rosa und lila.
After all the items were finished I let it dry again and then put together my MDF letter rack. Through the slot they fit together very well and also keep without having to use glue.
I still could not decide to decorate it, so it's still 'blank' in pink and purple.

Ich hoffe, Euch hat mein erster Beitrag gefallen. Demnächst gibt es Karten mit den tollen Stencils von Pronty Crafts von mir für Euch.
I hope you liked my first post. Soon there will be cards with the great stencils of Pronty Crafts from me for you.
Lieben Dank fürs Vorbeischauen und bis zum nächsten Mal.
Thanks so much for stopping by and enjoy your day.
Alles Liebe |
Best Wishes
Hallihallo, ich hoffe, Euch geht's gut :) Heute habe ich eine Geburtstagskarte, die ich zeigen möchte. Mein Bruderherz hat am Wochenende Geburtstag und 'Männerkarten' sind ja immer so eine Sache, stimmt's? Mit dieser Karte können wir ihm hoffentlich eine Freude machen :)
Hiya everyone, I hope you're fine :) Today I have a birthday card that I want to share with you. It's my brother's birthday this weekend and 'men's cards' are always such a thing, right? We hope he'll like this card. :)
Für den Hintergrund habe ich den Ballonstempel von Create A Smile verwendet und weiß embosst. Dann habe ich den Hintergrund mit verschiedenen
Mini Distress Ink Pads -
Faded Jeans,
Peacock Feathers und Salty Ocean zeingefärbt. Den einzelnen Ballon habe ich mit den Stanzen und Stempeln von Kulricke gestaltet. Mittels doppelseitigem Abstandsklebeband habe ich einen Shaker-Ballon daraus gemacht ;)
For the background I used the balloon stamp of Create A Smile and embossed it white. Then I dyed the background with different Mini Distress Ink Pads - Faded Jeans, Peacock Feathers and Salty Ocean . I designed the individual balloon with the cutting dies and stamps from Kulricke. It has become a shaker balloon ;)
Am unteren Rand habe ich wieder einen Streifen Vellum verwendet. Der Text HAPPY stammt von der
Noor! Design Stanze Happy Holidays. Dazu habe ich schwarzen Cardstock dreimal ausgestanzt und dabei das
Adhesive Tape verwendet. Man klebt das Tape auf den Cardstock (oder jedes andere Papier), mit der Maschine (Trouvaille oder Big Shot etc) ausstanzen und fertig. So klebt es sauber und ordentlich auf- bzw. übereinander, man hat kein hässliches Verschmieren von Kleber. Sehr genial und einfach, oder? Den Schriftzug Birthday habe ich mit meinem Dymo Labeler gemacht.
At the bottom I used a strip of Vellum. The text HAPPY comes from the Noor! Design Cutting Die Happy Holidays. I punched black cardstock three times using the adhesive tape. You stick the tape to the cardstock (or any other paper), die cut with the machine (Trouvaille or Big Shot etc) and finished. It sticks neatly and neatly on top of one another, you do not have an ugly smearing of glue. Very awesome and simple, right? I wrote the lettering "Birthday" with my Dymo Labeler.
Glücklicherweise passt mein Kärtchen auch zur
Task for Two Thuesday Challenge mit dem Thema rot / blau / weiß
Ich hoffe, Euch hat das Kärtchen auch gefallen?
I hope you'll like my card too.
Bis bald |
see you soon
Dunja
Einen schönen Donnerstag Ihr Lieben! Noch 7 (in Worten: sieben) Wochen ist Heiligabend... die Zeit rennt unaufhörlich und so allmählich sollte die Advents- und Weihnachtsproduktion beginnen. Seid ihr auch schon fleissig dabei? :)
Have a wonderful Thursday together! Still 7 (in words: seven) weeks, it's Christmas Eve ... time flies and gradually you should start the Advent and Christmas production. Are you already busy in creating the Christmas stuff? :)
Heute möchte ich Euch einen
Adventskalender To-Go zeigen. Die tolle Schokolade fand ich neulich beim Stöbern im www und da ich die Idee besonders süß finde, habe ich sie gleich mal hübsch in einer Karte verpackt. Um ehrlich zu sein, ich bezweifel, dass der oder die Beschenkte eisern bleibt und die Schokolade bis zum Heiligabend hält ;)
Today I want to show you an Advent Calendar To-Go. The fun chocolate I found recently while browsing the web and I think the idea is especially sweet, I created a card and put the chocolade in. To be honest, I doubt that the recipient keeps the chocolate until Christmas Eve ;)
Die Tannenbäume und das Rehlein sind Stanzen von
Noor! Design. Der Schriftzug
{Hilfe} Es weihnachtet! ist ein Clearstamp von
Create a Smile. The Dies i've used are from Noor! Design and the german sentiment is a clearstamp from
Create a Smile.
Ich habe eine Banderole um meine Karte gebastelt und dann verziert. Dazu habe ich verschiedene Stanzen, Glöckchen, Pailetten und Holzherzchen verwendet. Den Text Adventskalender to go habe ich mit meinem Dymo Labeler gemacht.
I made a banderole around my card and then I adorned it. In addition I've used several dies, little bells, sequins and wooden hearts. The text Advent to go I made with my Dymo Labeler.
Hier findet Ihr übrigens eine Schneeflocke aus meinem
How-To-Use Stick It wieder.
By the way, here you'll find a little snowflake of my How-To-Use Stick It.
Den gesamten grauen Fotokarton habe ich mit Gesso gewischt. So sieht es schön shabby aus. Den Innenteil habe ich auch noch ein wenig verziert.
The whole gray cardstock I wiped with Gesso. So it turns out pretty shabby. At the inner part there is just a little deco.
Ich hoffe, der Adventskalender To Go hat Euch gefallen? Was sind Eure Lieblingsfarben für die Weihnachtsbastelei? I hope you enjoyed the advent calendar to go? What are your favorite colors for Christmas crafting?
Habt einen schönen Nachmittag | have a nice day


Share some Love | Follow me


 ♥ Danke | Thanks
Hallo Ihr Lieben, mal ehrlich, wer kennt das nicht? .....da hat man eine so schöne filigrane Stanze, stanzt sie aus Designpapier o.ä. aus, will sie auf die Karte bringen und dann .....verschmiert der Kleber, weil man selten so fein arbeiten kann, dass man Klebereste nicht mehr sieht. Stimmts??
Zugegeben, auch mich hat das schon das eine oder andere mal geärgert, aber jetzt habe ich
DAS Produkt gefunden, mit dem man mühelos filigrane Stanzteilchen ordentlich und ohne Kleber-Kleckern auf sein
(fast) fertiges Werk bekommt. Das Zauberwort heißt
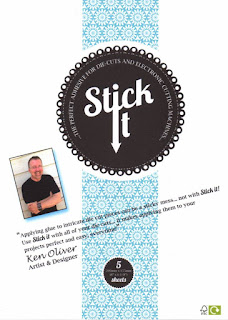
Stick-It
Hi Everyone, honestly, who does not know this? .....there is a beautiful filigree die, we cut them out of patterned paper, want to stick it to the card and then ..... the glue smudged, isn't it??
Added thereto I was annoyed already, but now I've found THE product. You can easily get filigree punched parts on your creations, neat and without adhesive spills. The magic word is Stick-It
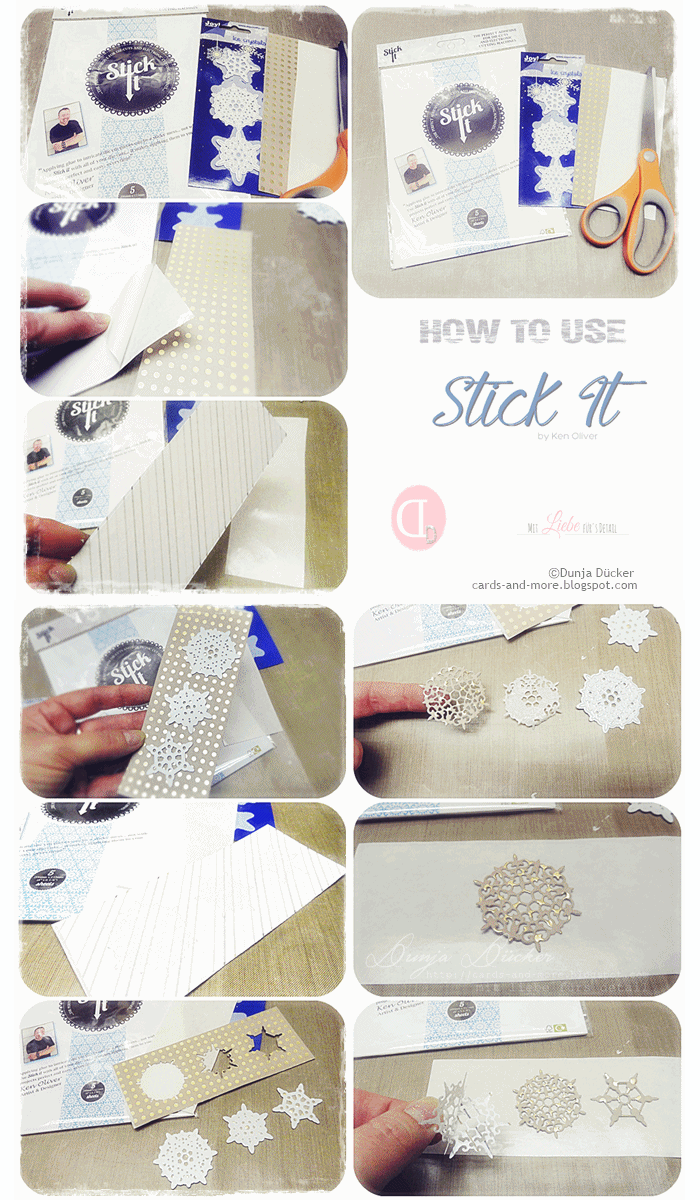
Wenn Ihr die Bilder seht, könnt ihr erkennen, wie sauber und ordentlich es aussieht.
Look at the pictures and see, that it's pretty easy to use.
Ihr nehmt einen Bogen
Stick-It, schneidet ihn passend zu der Größe des Designpapier. Klebt es auf die Rückseite - achtet darauf, dass keine Luftbläschen entstehen - legt die Stanzen auf und kurbelt das ganze durch Eure Maschine - so wie immer. Anschließend nehmt ihr die Ausstanzung aus der Schablone, zieht die transparente Folie ab und klebt das Stanzteil auf -
der Clou: Es ist selbstklebend und hält!
Cut a piece of Stick It to the size needed for your project. Peel away
the protective layer to expose the adhesive, using the handy easy-peel
area running along the length of the sheet. Apply Stick It to the
reserve side of the material you wish to die-cut, taking care to avoid
creases or air bubbles. Die-cut your chosen material in the usual
way. Once you have removed your cut shape from the die, simply remove
the protective layer from the back and Stick It. The adhesive has been
specially formulated to remain repositionable for a period and will
become permanent over time.
Stick It ist in zwei Größen lieferbar |
Stick it is available in two different sizes
Die fertige Karte, auf der ich diese Eiskristalle verwendet habe, zeige ich Euch demnächst!
The card, where i've used the icecristalls i'll show you soon.
Share some Love | Follow me
♥ Danke | Thanks